Configuring fencing
STONITH, or fencing [1], is the mechanism by which Pacemaker makes sure that nodes that misbehave don’t cause any additional problems. If a node that was running a given resource stops communicating with the other nodes in the cluster, there is no way to know if that node is still running the resource and for whatever reason is just unable to communicate, or if it has crashed completely and the resource needs to be restarted elsewhere.
In order to make certain what is uncertain, the other nodes can use an external fencing mechanism to cut power to the misbehaving node, or in some other way ensure that it is no longer running anything.
There are many different fencing mechanisms, and which agent to use depends strongly on the type of nodes that are part of the cluster.
For most virtual machine hosts there is a fencing agent which
communicates with the hypervisor, for example the fence_vbox or
external/libvirt agents. For physical hardware, the most general
fencing device is called SBD, and relies on shared storage like a
SAN.
external/libvirt
There are several different fencing agents available that can
communicate with a libvirt-based hypervisor through the virsh
command line tool. In this example, fencing device of choice is the
stonith:external/libvirt agent. This ships as part of the
cluster-glue package on openSUSE, and is already installed on the
cluster nodes.
To ensure that communication between the cluster nodes and the hypervisor is authenticated, we need the SSH key of each node to be authorized to access the hypervisor.
In the example cluster, Vagrant has already created an SSH key for
us. If you do not have an ssh key, you will need to run the
ssh-keygen command as root on each node:
$ ssh-keygen -t rsa
Once the SSH keys have been created, execute the following command as
root on each of the cluster nodes:
$ ssh-copy-id 10.13.38.1
Replace 10.13.38.1 with the hostname or IP address of the
hypervisor. Make sure that the hostname resolves correctly from all of
the cluster nodes.
Before configuring the cluster resource, lets test the fencing device
manually to make sure it works. To do this, we need values for two
parameters: hypervisor_uri and hostlist.
For hypervisor_uri, the value should look like the following:
qemu+ssh://<hypervisor>/system
Replace <hypervisor> with the hostname or IP address of the
hypervisor.
Configuring the hostlist is slightly more complicated. Most
likely, the virtual machines have different names than their
hostnames.
To check the actual names of your virtual machines, use virsh list
as a privileged user on the hypervisor. This is what the output can
look like:
 Id    Name                           State
----------------------------------------------------
 4     hawk-guide_alice               running
 7     hawk-guide_bob1                running
 8     hawk-guide_bob2                running
If the names of the virtual machines aren’t exactly the same as the
hostnames alice, bob1 and bob2, you will need to use the
longer syntax for the hostlist parameter:
hostlist="alice[:<alice-vm-name>],bob1[:<bob1-vm-name>],..."
Replace <alice-vm-name> with the actual name of the virtual
machine known as alice in the cluster. If the virtual machines
happen to have the same name as the hostname of each machine, the
:<vm-name> part is not necessary.
With this information, we can reboot one of the Bobs from
Alice using the stonith command as root:
$ stonith -t external/libvirt \
    hostlist="alice:hawk-guide_alice,bob1:hawk-guide_bob1,bob2:hawk-guide_bob2" \
    hypervisor_uri="qemu+ssh://10.13.38.1/system" \
    -T reset bob1
If everything is configured correctly, this should be the resulting output:
external/libvirt[23004]: notice: Domain hawk-guide_bob1 was stopped
external/libvirt[23004]: notice: Domain hawk-guide_bob1 was started
Once the fencing configuration is confirmed to be working, we can use Hawk to configure the actual fencing resource in the cluster.
Open Hawk by going to https://localhost:7630 and select Add a Resource from the sidebar on the left.
Click Primitive to create a new primitive resource.
Name the resource
libvirt-fenceand in the selection box for Class, choosestonith. The Provider selection box will become disabled. Now chooseexternal/libvirtin the Type selection box.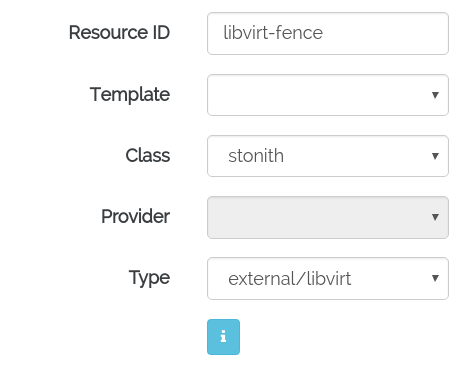
For the
hostlistandhypervisor_urlparameters, enter the same values as were used when testing the agent manually above.Change the
target-rolemeta attribute toStarted.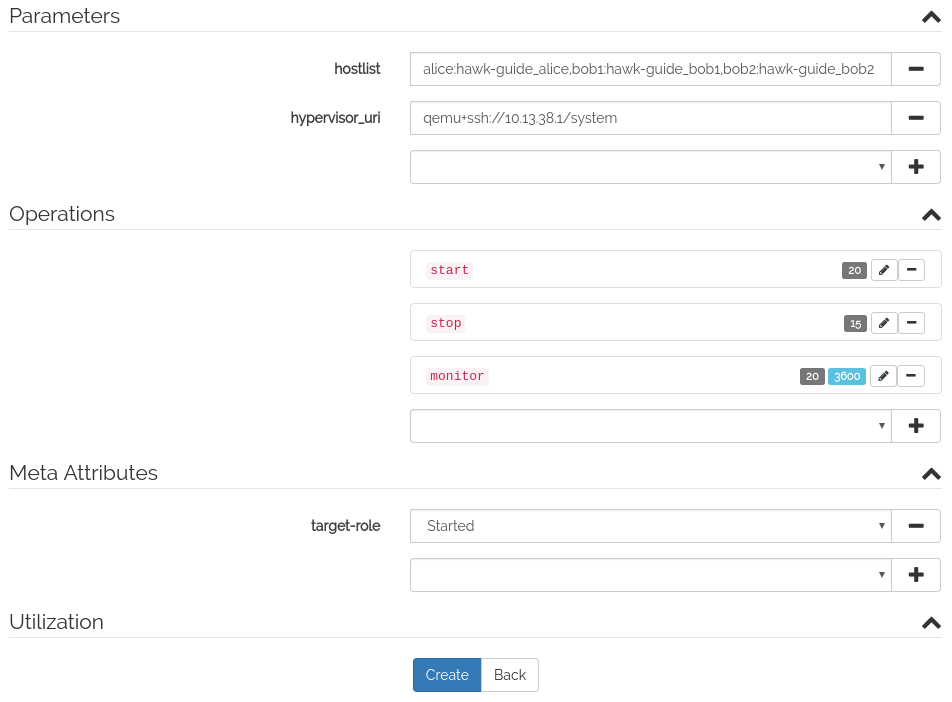
Click the Create button to create the fencing agent.
Go to the Cluster Configuration screen in Hawk, by selecting it from the sidebar. Enable fencing by setting
stonith-enabledtoYes.
A note of caution: When things go wrong while configuring fencing, it can be a bit of a hassle. Since we’re configuring a means of which Pacemaker can reboot its own nodes, if we aren’t careful it might start doing just that. In a two-node cluster, a misconfigured fencing resource can easily lead to a reboot loop where two cluster nodes repeatedly fence each other. This is less likely with three nodes, but be careful.
fence_vbox (VirtualBox) [TODO]
The fence agent for clusters using VirtualBox to host the virtual
machines is called fence_vbox, and ships in the fence-agents
package.
The fence_vbox fencing agent is configured in much the same way as
external/libvirt.
TODO
external/ec2 (Amazon EC2) [TODO]
The external/ec2 fence agent provides fencing that works for
cluster nodes running in the Amazon EC2 public cloud.
Install the AWS CLI. For instructions on how to do this, see the Amazon start guide: http://docs.aws.amazon.com/cli/latest/userguide/cli-chap-getting-started.html
Create the fence resource with the following commands (replacing
<node>and<tag>with appropriate values for your cluster:$ crm configure primitive fencing-<node> stonith:external/ec2 \ params \ pcmk_off_timeout="300s" \ port="<node>" \ tag="<tag-name>" \ op start interval="0s" timeout="60s" \ op monitor interval="3600s" timeout="60s" \ op stop interval="0s" timeout="60s" $ crm configure location loc-fence-<node> \ fencing-<node> -inf: <node>
It is necessary to create a separate fence resource for each node in the cluster. The location constraint ensures that the fence resource responsible for managing node A never runs on node A itself.
TODO: Verify these instructions, use Hawk to configure the resource.
SBD [TODO]
SBD [2] can be used in any situation where a shared storage device such as a SAN or iSCSI is available. It has proven to be more reliable than many firmware fencing devices, and is the recommended method for fencing physical hardware nodes.
There are two preparatory steps that need to be taken before configuring SBD:
- Ensure that you have a watchdog device enabled. Either this is available depending on your platform, or you would use the software watchdog that the Linux kernel provides. Note that use of the software watchdog makes SBD less reliable than with a true watchdog device.
- Set up a shared storage device. This needs to be writable by all nodes. It can be very small, SBD only needs about 1MB of space, but it cannot be used for anything other than SBD.
Once a watchdog is enabled and all cluster nodes can access the shared block device, SBD can be enabled and configured as a cluster resource:
Configure SBD using the /etc/sysconfig/sbd configuration file. For details on how to configure SBD, see the SBD man page: https://github.com/ClusterLabs/sbd/blob/master/man/sbd.8.pod
Enable the SBD service on each cluster node:
$ systemctl enable sbd
$ systemctl start sbd
Configure the SBD cluster resource:
$ crm configure \
    primitive fencing stonith:external/sbd \
    pcmk_delay_max=30
TODO: Verify these instructions, use Hawk to configure the resource.
Footnotes
| [1] | The two terms come from the merging of two different cluster projects: The Linux HA project traditionally uses the term STONITH, while the Red Hat cluster suite uses fencing to denote the same concept. |
| [2] | Shared-storage Based Death. https://github.com/ClusterLabs/sbd |